
Page 63 - Visual Guidance Handbook
P. 63
Let’s all
CONCRETE TESTING AND SAMPLING (SLUMP) get home safely,
every day
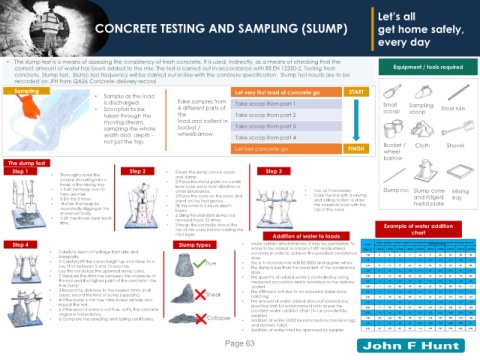
• The slump test is a means of assessing the consistency of fresh concrete. It is used, indirectly, as a means of checking that the
correct amount of water has been added to the mix. The test is carried out in accordance with BS EN 12350-2, Testing fresh Equipment / tools required
concrete. Slump test. Slump test frequency will be carried out in line with the concrete specification. Slump test results are to be
recorded on JFH form QA26 Concrete delivery record
Sampling Let very first load of concrete go START
• Sample as the load
is discharged. Take samples from Take scoop from part 1 Small Sampling
• Scoopfuls to be 4 different parts of scoop scoop Steel rule
taken through the the Take scoop from part 2
moving stream, load and collect in
sampling the whole bucket / Take scoop from part 3
width and depth - wheelbarrow. Take scoop from part 4
not just the top. Bucket / Shovel
Let last concrete go FINISH wheel- Cloth
barrow
The slump test
Step 1 Step 2 • Ensure the slump cone is clean Step 3
• Thoroughly remix the and damp.
sample shovelling into a • 2 Place the metal plate on a solid
heap in the mixing tray. level base away from vibration or
• 2 Turn the heap over to other disturbance. • Top up if necessary. Slump rod Slump cone Mixing
form another. • 3 Place the cone on the plate and • 2 Use the rod with a sawing
• 3 Do this 3 times. stand on the foot pieces. and rolling motion to strike and ridged tray
• Flatten the heap by • Fill the cone in 3 equal depth the concrete level with the metal plate
repeatedly digging in the layers. top of the cone
shovel vertically. • 2 Using the standard slump rod,
• 2 Lift the shovel clear each rod each layer 25 times.
time. • 3 Heap the concrete above the Example of water addition
top of the cone before rodding the chart
third layer Addition of water to loads
Step 4 Slump types • under certain circumstances, it may be permissible for
• Carefully clean off spillage from side and water to be added to a load of stiff ready-mixed
concrete in order to achieve the specified consistence
baseplate. class.
• 2 Carefully lift the cone straight up and clear, to a True • This is in accordance with BS 8500 and applies when:
count of between 5 and 10 seconds • the slump is less than the lower limit of the consistence
• Lay the rod across the upturned slump cone. class
• 2 Measure the distance between the underside of • the quantity of added water is controlled by being
the rod and the highest point of the concrete - the measured accurately and is recorded on the delivery
true slump. docket
• 3 Record this distance to the nearest 5mm. In all • the stiffness is not due to an excessive delay since
cases, record the kind of slump (opposite). Shear batching
• 4 If the slump is not true, take a new sample and • the amount of water added does not exceed any
repeat the test. specified limit for water:cement ratio as per the
• 5 If the second slump is not true, notify the concrete providers water addition chart (to be provided by
engineer immediately. supplier)
• 6 Complete the sampling and testing certificates. Collapse • Addition of water MUST be recorded on concrete logs
and delivery ticket.
• Addition of water must be approved by supplier
Page 63